how to construct a custom picket fence
As summer begins, for many of us, it is the time to pull out the list of outdoor projects we have planned and start working on them. Putting up a fence is one of those items that falls on many peoples list of outdoor improvement projects. If you are thinking about tackling the project yourself, read on to understand the basics of constructing your ideal fence and some tips and tricks for it to go as smoothly as possible.
First and foremost, you need a plan in place. If you don’t already have one, check out our post on how to design a custom fence before proceeding with the build.
Mark the Fence Line. Start the project by marking a straight line where your fence will go. This can be done easily with stakes and string. Be sure to square the corners of the fence as you are putting up the string lines. If you are setting the fence posts level to the ground, (with varying overall heights) measure the distance from the ground to the string and ensure it is the same height from the ground across the length of the string. If you are setting the fence posts level with each other, use a level on top of the line and adjust it to be level. Final adjustments to the height of the line can be done later when putting in the posts. Having square and straight lines is the critical point at this stage.
Dig the post holes. First, use a measuring tape and mark along the lines you established where each post will go according to your fence plan. Having your line close to the ground at this stage can help make measuring easier. Once you have established the locations mark them with a stake or spray paint and begin digging. This can be done manually with a post hole digger. Remember to make sure there are no buried wires before digging. Dig the holes to a depth that will leave the amount of fence post you want visible above the ground. Remember to that the posts need to be deep enough to be below the frost line.
Put in the fence posts. Put in each fence post one at a time. To start, put the post in the hole, careful to not hit the sides and knock dirt back into the hole. Double check that the height of your post is correct. Next, prepare the concrete for filling your hole. In a large wheelbarrow, mix concrete with water until the fully wet. Add water slowly so you don’t add too much. The concrete should be able to flow, but slowly. Review the bag of concrete for additional instructions. Make sure the post is level and square to the line you created. Remember to check the levelness in all directions. Shovel in the concrete filling in the majority of the hole. The last few inches can be filled in with dirt once the concrete sets. While shoveling the concrete in, using a metal rod, work any air bubbles out of the concrete. Do this by moving the rod up and down through the concrete. Depending on your situation, if your post is moving or hard to keep level, prop it in place in its level position with something like stones. Let the concrete set 24 hours.
Attach the stringers. Once the posts are in place, it is time to connect them with stringers (the wood supports for the pickets). Do this as soon as you can to help prevent any warping or bending of the posts. Cut the stringers based on your fence design and attach with wood screws. If you are having an exposed fence post (not covered by a picket) and will be painting your fence, consider attaching using metal brackets for a more secure attachment then screwing in at an angle. Based on your post spacing and overall height of the fence you will want 2 or 3 strings between each post.
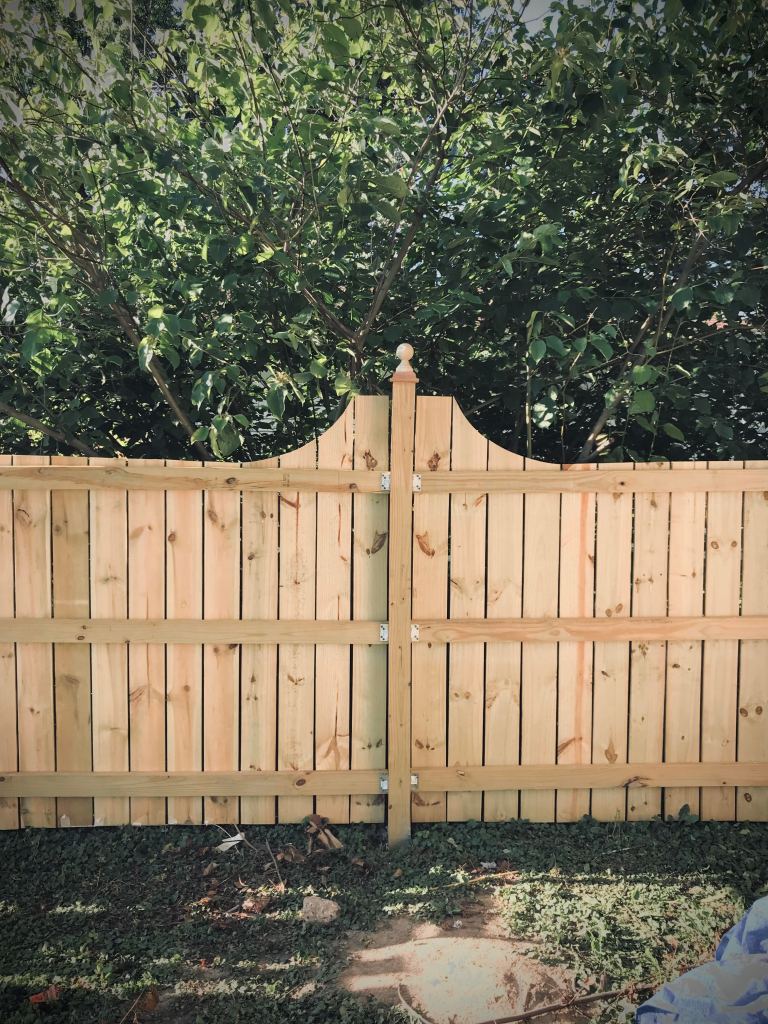
Attach the pickets. Based on your fence design, cut each picket to the correct shape and length needed. Cutting to the correct length is the most difficult for areas where the yard slopes significantly. Based on the design of the fence, you could choose to have a steady slope in your picket height, keep the top of the pickets level with each other, or do a terraced approach. Begin attaching pickets by screwing or nailing into the strings with exterior rated screws/nails. If you are going to have to use a partial picket (the space is not perfect for a whole number of pickets) consider where you want to work through that issue. Usually, you would put a narrower picket on a far corner or if you have exposed posts, you may want the board in the middle. You could also consider slimming several pickets down or adjusting the spacing slightly between pickets to adjust for the space. Put your pickets up in a way that you tackle this area last. Consider cutting a scrap board to the correct spacing between your pickets for easier assembly. Be sure to note that some pickets may not be perfectly straight. As you are putting pickets up, make sure to check that you are not introducing an angle in the pickets. Take your time in putting the pickets up – this is going to be what you notice most with your fence.
Build the gates. Construct the gates according to your fence design. Remember to make the gate smaller than the opening so your gate will have room to swing. Build the frame which is typically a large square/rectangle with a diagonal support in the square. The bottom of the diagonal should be closer to the side that will be hinged. With that in mind to guide frame orientation, attach pickets to the gate frame.
Finish the fence. Top off your fence with the finishing decorative details in your design such as post toppers. Use wood filler to fill in the screw holes if desired. Stain or prime/paint the fence as desired. Do the same with the gates before attaching them. Hang the gates; to do this it is helpful to have something under the gate to support it while installing. Add some landscaping around the fence if desired to finish it off.
With these steps, you can create your own fence that is beautiful and unique. Happy building!
