HOw to create a fence plan, and key factors to consider
Building a fence is not as hard as you think. It is rewarding to see it come together as you put in posts, get the pickets up, and finally finish it off with gates. Building your own fence also allows you the freedom to create unique one-of-a-kind fences at a much lower price than contracting it out. The first stage of course is planning. Planning not only makes sure that you have a design that you enjoy but can help you avoid issues in the building process. This article is written with a picket style fence in mind but has principles that would be helpful for a variety of fence types. With that, let’s dive in to the technical and decorative aspects of fence design and planning.
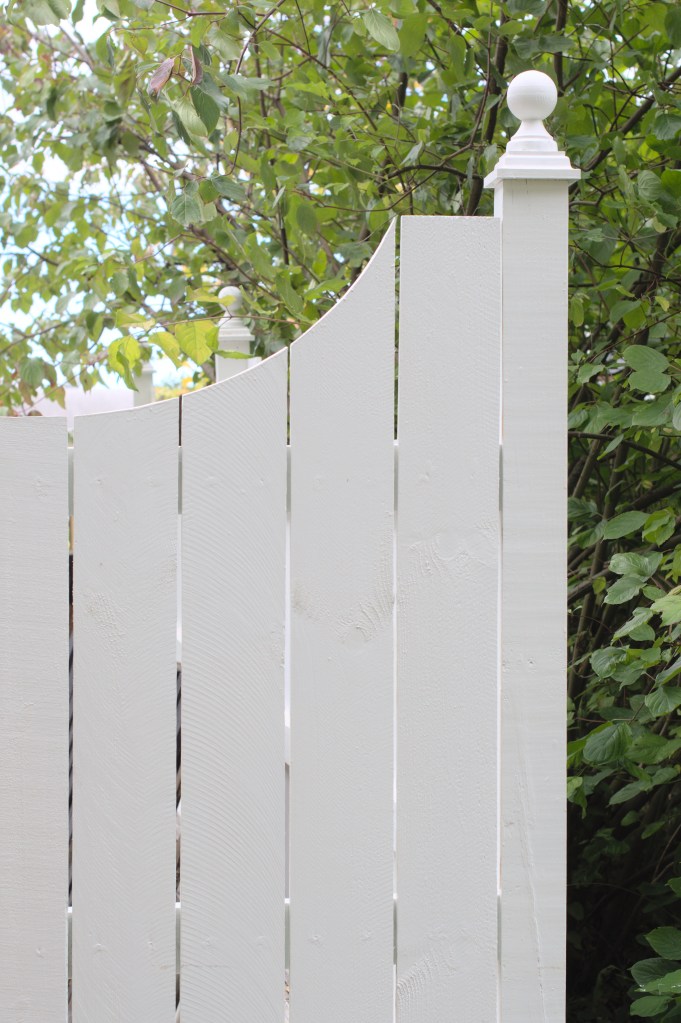
Planning is the first step to creating a beautiful custom fence.
Decide on a fence style. The first step in designing a fence is to decide how you want it to look. Look through pictures, walk around your neighborhood, think about how you want your fence to appear – elegant, rustic, traditional. Consider the purpose of the fence – is it for privacy or more for decoration? Knowing the answer to questions like these will help to narrow down design decisions. After you have done your research, sketch out what you want your overall fence to look like or have a photo of one you want to copy. Determining the general appearance of your fence will enable you to have a clear understanding of materials you will need as you approach specifics of the design phase as well as any challenges or additional steps or factors for consideration you may encounter.
Fence Regulations. Before you get into the weeds of specifics for your fence, it is important to understand any restrictions around building your fence. Cities will have varying regulations on where fences can be placed relative to roads, how much you can see through them depending on location, and height restrictions. Knowing these will help you understand what you can and cannot do with your fence. Be sure to check if you are required to have a permit for building the fence as well.
Plan the locations of the fence segments. After knowing any pertinent regulations, you can determine where you want to build your fence. The first step in this process is to call/or request online to have your property flagged for buried lines. Lines may impact where you can place post holes for your fence. Being aware of this during the planning phase makes sure you won’t have complications or dangerous situation later on when digging post holes. After you have had your yard flagged, complete the following steps for the general location of your fence.
- Determine roughly where you want the fence to be.
- Determine where you want gates and the width of the gate opening. Make the gate openings wide enough to accommodate any large objects (such as a lawn mower). Remember to add 1-2 inches to the width you want your gate to be for the gate opening measurement. This ensures the gate will swing freely swing even if the wood swells over time.
- Determine if the locations for your fence segments have flexible distance (i.e. you can set the length of those fence sections to whatever length you want) or are restricted (i.e. you are putting a fence between your house and a neighbor’s fence and want the two to connect)
- Take measurements for each segment of fence (a portion fence running in a straight continuous line) and note distances that are flexible vs not.
Plan the details of the fence segments. Now it time to make decisions on specific details of your fence design. Work through the following decisions.
- Decide on the type of fence post you will use and if they will be visible in your design. 4×4 posts for example, are very standard but you could use 6×6 or other types. If your posts are visible, it simply means that you can see the front face of the post from the front of the fence. Determining visibility will help dictate fence assembly and build later on.
- Decide on the maximum height of the fence. This will in turn help you select pickets that are the right height.
- Decide on the specific pickets you will use. Note the actual width of these pickets.
- Decide on the spacing between pickets. While you can have no space, I recommend at least a 1/4 in spacing, especially if you have not done a fence before. This helps the overall visual appearance if your boards are not perfectly straight. I also recommend getting two or three pickets and holding them up to determine spacing. Seeing a visual really helps choose a spacing that you like, minimizing potential design changes later.
Plan the details of the gates. Many gates follow a similar style or pattern to the fence style, though the gate can be a place to add an accent design. If you don’t have a design in mind, go back and do a bit of inspirational research to find a style you like. Gates typically have a rectangular frame of 2x4s with a diagonal cross beam or X cross beams. Then wood pickets are placed on the front. Design your gate in the style you choose, deciding on the following design points.
- Decide the direction your gates will swing (in or out) and the side ( left or right) they will be hinged from.
- Choose gate hardware – hinges, locks, and handles.
- Design the structural frame of the gate. Be sure to include at least a one diagonal cross beam, with the lower end of the diagonal on the side of the gate that is hinged to ensure structural integrity. In addition, be sure the frame is thick enough to be flush with the front of the fence and accommodate any hardware that was selected, such a lock on the back.
- Decide the picket layout and the specific dimensions of the gate, keeping in mind picket spacing and the minimum needs of your gate width and the extra space needed for the gate opening to allow the gate to swing properly.
Plan the decorative details of the fence segments. Now that the core planning details have been made, it is time to dive into the more decorative aspects. If you are doing a unique top to your pickets such as cutting them in a curve or topping them with a trim board, take this time to map out the specifics of what this requires. Consider the following while thinking through this phase of planning.
- Determine the wood type will you be using (or other material type details). Pressure treated pine is the standard, especially if you intend to paint it. Cedar is also common, especially if you want a wonderful natural wood tone to your fence.
- Determine any needs for additional materials for any trim work or decorative aspect to the fence.
- Select post toppers or caps if desired.
- Finalize plans for any modifications to the picket shape, such as a curve by drawing or creating a template or guide for consistent cutting. For example, draw out your shape on cardboard to use when marking cuts on a picket.
- Decide on any finishing material such as paint or stain.
Plan the technical details of the fence segments. With your previous decisions you can now map out the specifics of your fence lengths and post locations and finalize the remaining structural details.
- Decide on the distance between fence posts for the different segments of fence. Standard distances are 8-12 feet. You can choose to have consistent distances for all segments of fence if you able or choose gaps that work best in your given space by dividing each segment into equal sections. If you have some flexibility with segment length, choose distances that work easily with your design (i.e. wouldn’t require a partial picket) making sure you look at picket width and spacing and if the posts will be visible or not. Remember during this to use the actual dimensions of the wood, a 4×4 is actually 3.5×3.5 for example.
- Decide depth of posts. Make sure you follow any code requirements here. In absence of code requirements, make sure the posts are below frost line. For example, choose a depth of 4 feet if the frost line is at 3 feet. In addition, determine what you will use to fill the holes – concrete is recommended.
- Decide height of posts relative to ground. If highly variable ground, you may need to put your posts relative to the ground and terrace your pickets down. Alternatively, you could choose to keep the posts all level with each other, regardless of ground height. One design recommendation here is to keep the posts on either side of your gate to be the same height even if the ground varies at your gate.
- Decide on total post height needed by adding the depth and height above the ground together.
- Decide number and material of stringers. The more stringers, the more secure the pickets will be. I recommend 3 for fences 5ft or taller.
- Decide how you will attach stringers (i.e. use a bracket if not attaching in front of the post). Make sure screws you choose are long enough to go through material you are using.
- Decide how to attach pickets. Wood screws or nails will work, but make sure they are rated for exterior use. In addition, determine if you will be covering the heads of the screws with wood filler to hide them.
Consider how to deal with partial pickets. The best plans on paper don’t always perfectly line up when you go to build. There may be some problem solving as you construct your fence. Planning following this outline will certainly help minimize those challenges, but if you put a post 2 inches off, and now have to somehow fill that gap with a partial picket, what do you do? Think through the following to help form a plan for dealing with this should it arise.
- Plan the best way to attach pickets. You can either attach left to right, (from one post to the other), or from both post ends, working in. The best option will depend on the design of your fence and the location in terms of what pickets will be the most visible.
- Decide how to deal with variance in spacing. I recommend the following: cut the last 3 or 4 pickets smaller, increase/ decrease the gap size slightly to accommodate. The alternative would be to cut the last picket to whatever size gap remains, but this can lead to very thin pickets that can seem out of place depending on where they are.
Create your purchase list. To wrap up your fence plan, create a list of all the materials you need by reviewing the decisions you made above.
Congratulations! You can now plan and design your own custom fence. While there are a lot of steps, thinking through these things before you start digging post holes, will help your fence building be quick and smooth.
Looking for a fence design inspiration? Check out our new fence reveal!
